この記事はOpenCV Advent Calendar 2017の12/17のエントリーです。
ここのところIonic3を使ってモバイルアプリを作ることが良くあります。なぜ、React NativeではなくIonicなのかは、本題ではありませんが、Ionicには非常によくできたアプリのテンプレートが多数あって、都合が良かったからです。
OpenCVには、高速軽量のARライブラリArUcoがあります。これはiPhone6ぐらいでもストレスなく動くので、Ionic3などのハイブリッドアプリで使えれば便利と思ったのですが、探しても見つけられなかったので、試しに作ってみました。
今回はiOS用のみを作ります。開発環境はMac (OSX 10.13.2)、Ionic 3.19.0、Xcode 9.2です。
OpenCV3のビルド
まず、opencv_contribを含んだiOS用OpenCVをビルドします。以下の記事を参考にしました。
opencv_contribを有効にしたopencv2.framework(for iOS)生成方法
ただし、OpenCV3.3.1ではopencv_contribに対応済みなので、ステップ3のbuild_framework.pyの差し替えは必要ありません。
今回のビルド手順は以下のようになります。
- 作業用のディレクトリを作ります。ここではaruco-ionic/opencv3にしました。
$ mkdir aruco-ionic
$ cd aruco-ionic
$ mkdir opencv3
$ cd opencv3
- https://github.com/opencv/opencv/releasesから最新(使いたい)バージョンのソースコードを作業用ディレクトリにダウンロードします。ここではOpenCV 3.3.1のsource codeをダウンロードし、展開します。
- https://github.com/opencv/opencv_contrib/releasesからopencvのバージョンに合わせたソースコードをダウンロードします。今回は3.3.1のソースコードをダウンロードし、展開します。
- ビルドスクリプトを実行してビルドします。
python opencv-3.3.1/platform/ios/build_framework.py --contrib opencv_contrib ios
- ビルドが終了すると、./ios/の下にopencv2.frameworkができています。
cmakeのバージョンが新しいとステップ4でビルドエラーとなることがあります。その場合は古いバージョンを試してください。今回はcmake 3.9.4でビルドできました。
Cordova Pluginを作る
Ionic3, cordovaのpluginの作成方法については、ionic3のNative pluginを作るに書いています。これに従って作っていきます。最初にCordova Pluginを作ります。
まず、作業用のディレクトリにcordova pluginのテンプレートをgithubからクローンします。
$ mkdir aruco-ionic
$ cd aruco-ionic
$ git clone https://github.com/ionic-team/cordova-plugin-template.git ArUcoCordovaPlugin
これでカレントディレクトリにArUcoCordovaPluginというディレクトリができました。ディレクトリは以下のようになっています。
ArUcoCordovaPlugin
├── LICENSE
├── README.md
├── package.json (*)
├── plugin.xml (*)
├── src
│    ├── android
│    │    └── com
│    │          └── example
│    │                └── MyCordovaPlugin.java
│    └── ios
│          ├── MyCordovaPlugin.h (*)
│          └── MyCordovaPlugin.m (*)
└── www
      └── plugin.js (*)
この後、*をつけたファイルを変更していきます。
package.jsonを変更
package.jsonにcordovaプラグインのパッケージ名を設定します。ここではパッケージ名をcordova-plugin-arucoにしましたので、package.jsonを以下のようにします。
{
  "name": "cordova-plugin-aruco",
  "version": "0.1.0",
  "cordova": {
    "id": "cordova-plugin-aruco",
    "platforms": [
      "android",
      "ios"
    ]
  },
  "description": "The ArUco plugin for Cordova enables the use of AR of OpenCV to detect AR markers"
}
plugin.xmlの変更
次にplugin.xmlを変更します。cordovaプラグインを呼び出す名前をcordova.plugins.ArUcoとします。また、ios用のソースファイルの名前を”ArUco.mm”, “ArUco.h”とし、フレームワークとして”opencv2.framework”を指定します。さらに、カメラを使うので、NSCameraUsageDescriptionを記述します。全体で以下のようになります。
<?xml version="1.0" encoding="UTF-8"?>
<plugin
    xmlns="http://apache.org/cordova/ns/plugins/1.0" id="cordova-plugin-aruco" version="0.1.0">
    <name>ArUco Cordova Plugin</name>
    <description></description>
    <license>MIT</license>
    <keywords></keywords>
    <!-- android -->

    <platform name="android">
        <js-module src="www/plugin.js" name="plugin">
            <runs/>
            <!-- This is the window variable name you want, like window.MyCordovaPlugin -->
            <clobbers target="cordova.plugins.ArUco" />
        </js-module>
        <config-file target="res/xml/config.xml" parent="/*">
            <feature name="ArUco">
                <param name="android-package" value="com.firstfournotes.aruco" />
                <param name="onload" value="true" />
            </feature>
        </config-file>
        <source-file src="src/android/com/firstfournotes/ArUco.java" target-dir="src/com/firstfournots/" />
    </platform>

    <!-- ios -->
    <platform name="ios">
        <js-module src="www/plugin.js" name="plugin">
            <runs/>
            <clobbers target="cordova.plugins.ArUco" />
        </js-module>

        <config-file target="config.xml" parent="/*">
            <feature name="ArUco">
                <param name="ios-package" value="ArUco" onload="true" />
            </feature>
        </config-file>

        <config-file target="*-Info.plist" parent="NSCameraUsageDescription">
            <string>This application needs camera access to perform image detection.</string>
        </config-file>

        <header-file src="src/ios/ArUco.h" />
        <source-file src="src/ios/ArUco.mm" />

        <framework src="src/ios/opencv2.framework" custom="true" />
    </platform>
</plugin>
以上がプラグインの設定関係のファイルです。
plugin.jsの変更
このファイルでJavaScript (TypeScript)から呼び出すときのメソッドを定義します。今回はOpenCVのバージョンを返すメソッドopenCVVersionString とArUcoをスタートするメソッド
startCameraの2つだけを定義します。いずれも引数は取らなく、コールバックを指定するのみです。
var exec = require('cordova/exec');

var PLUGIN_NAME = 'ArUco';

var ArUco = {
    openCVVersionString: function (cb) {
        exec(cb, null, PLUGIN_NAME, 'openCVVersionString', []);
    },
    startCamera: function (cb) {
        exec(cb, null, PLUGIN_NAME, 'startCamera', []);
    }
};

module.exports = ArUco;
MyCordovaPlugin.m、MyCordovaPlugin.hの変更
これらのファイルがプラグインの実体のなります。ファイル名をそれぞれArUco.mm、ArUco.hに変更して、Objective-C++でOpenCVの呼び出しを記述します。
ArUco.hは以下のようになります。
#import <UIKit/UIKit.h>
#import <opencv2/videoio/cap_ios.h>

#import <Cordova/CDVPlugin.h>

@interface ArUco : CDVPlugin <CvVideoCameraDelegate> {
        CvVideoCamera *cvCamera;
}

@property (nonatomic, retain) CvVideoCamera *cvCamera;

// funciton to get opencv version
- (void) openCVVersionString:(CDVInvokedUrlCommand*)command;
- (void) starCamera:(CDVInvokedUrlCommand*)command;

@end
ここではOpenCVが持っているカメラ機能を使うので、カメラオブジェクトの宣言とメソッドの宣言をしています。
次にArUco.mmを示します。
#import "ArUco.h"
#import <opencv2/imgcodecs/ios.h>
#import <opencv2/highgui.hpp>
#import <opencv2/aruco.hpp>
#import <opencv2/opencv.hpp>

@implementation ArUco

cv::Ptr<cv::aruco::Dictionary> dictionary;

- (void)pluginInitialize {
    // ArUco dictionary setting
    const cv::aruco::PREDEFINED_DICTIONARY_NAME dictionary_name = cv::aruco::DICT_4X4_1000;
    dictionary = cv::aruco::getPredefinedDictionary(dictionary_name);

    NSLog(@"----- ArUco OpenCV Version %s -----", CV_VERSION);
}

- (void) openCVVersionString:(CDVInvokedUrlCommand*)command {
    NSLog(@"opneCVVersionString %s", CV_VERSION);

    NSString* version = [NSString stringWithFormat: @"openCV Version %s", CV_VERSION];

    CDVPluginResult *result = [CDVPluginResult resultWithStatus:CDVCommandStatus_OK messageAsString:version];
    [self.commandDelegate sendPluginResult:result callbackId:command.callbackId];
}

- (void) startCamera:(CDVInvokedUrlCommand*)command {
    NSLog(@"start camera");

    UIImageView * cameraImageView = [[UIImageView alloc] initWithFrame:CGRectMake(0,
                                                                                  0,
                                                                                  self.viewController.view.frame.size.width,
                                                                                  self.viewController.view.frame.size.height)];
    [self.viewController.view addSubview: cameraImageView];

    cvCamera = [[CvVideoCamera alloc] initWithParentView:cameraImageView];

    cvCamera.defaultAVCaptureDevicePosition = AVCaptureDevicePositionBack;
    cvCamera.defaultAVCaptureSessionPreset = AVCaptureSessionPreset1280x720;
    cvCamera.defaultAVCaptureVideoOrientation = AVCaptureVideoOrientationPortrait;
    cvCamera.defaultFPS = 30;
    cvCamera.grayscaleMode = NO;
    cvCamera.rotateVideo = YES;
    cvCamera.delegate = self;

    [cvCamera start];
}

- (void)processImage:(cv::Mat &)image {
    if (image.empty()) {
        return;
    }

    cv::cvtColor(image, image, CV_RGBA2BGR);

    // マーカーの検出
    std::vector<int> marker_ids;
    std::vector<std::vector<cv::Point2f> > marker_corners;
    cv::Ptr<cv::aruco::DetectorParameters> parameters = cv::aruco::DetectorParameters::create();
    cv::aruco::detectMarkers(image, dictionary, marker_corners, marker_ids, parameters);

    // 検出したマーカーの描画
    cv::aruco::drawDetectedMarkers(image, marker_corners, marker_ids);
}
@end
pluginInitializeの中でArUcoで使うマーカーのディクショナリーを設定しています。今回は簡単にするために、ディクショナリーは固定です。
openCVVersionStringメソッドではバージョン文字列をCDVPluginResultオブジェクトを使ってコールバックで返しています。
startCameraメソッドでカメラを設定し、スタートしています。openCVのカメラは以下のように画像を描画するImageViewを与えて起動すると、勝手にviewに描画してくれます。
cvCamera = [[CvVideoCamera alloc] initWithParentView:cameraImageView];
ここでは簡単に表示させるために、以下のように、単純に現在のViewの上にカメラ画像用のViewを載せています。
  UIImageView * cameraImageView = [[UIImageView alloc] initWithFrame:CGRectMake(0,
                                                                                  0,
                                                                                  self.viewController.view.frame.size.width,
                                                                                  self.viewController.view.frame.size.height)];
  [self.viewController.view addSubview: cameraImageView];
OpenCVフレームワークの設定
最初にビルドしたopencv2.frameworkをArUco.mmと同じディレクトリにコピーします。
最終的なディレクトリ構成は以下の通りです。
ArUcoCordovaPlugin
├── LICENSE
├── README.md
├── package.json
├── plugin.xml
├── src
│   ├── android
│   │   └── com
│   └── ios
│       ├── ArUco.h
│       ├── ArUco.mm
│       └── opencv2.framework
└── www
    └── plugin.js
Ionic3 Native Pluginを作る
IonicでNative Pluginとして呼び出せるように、Native Pluginのラッパーを作ります。まず、作業用ディレクトリの下にnative pluginのコードをgithubからクローンします。
$ cd <work-directory>
$ git clone https://github.com/ionic-team/ionic-native.git
この中には全てのnative pluginのコードが入っており、そのままだとビルドに時間がかかるので全部消します。
$ rm -rf ionic-native/src/@ionic-native/plugins/*
次にnative pluginのためのテンプレートファイルを生成します。
$ cd ionic-native
$ gulp plugin:create -n ArUco
コマンドが終了すると以下のファイルができていますので、それを編集します。
src/@ionic-native/plugins/ar-uco/index.ts
このファイルにCordovaプラグインの情報、メソッドの定義を書き加えます。書き加えたファイルを示します。
/**
 * This is a template for new plugin wrappers
 *
 * TODO:
 * - Add/Change information below
 * - Document usage (importing, executing main functionality)
 * - Remove any imports that you are not using
 * - Add this file to /src/index.ts (follow style of other plugins)
 * - Remove all the comments included in this template, EXCEPT the @Plugin wrapper docs and any other docs you added
 * - Remove this note
 *
 */
import { Injectable } from '@angular/core';
// import { Plugin, Cordova, CordovaProperty, CordovaInstance, InstanceProperty, IonicNativePlugin } from '@ionic-native/core';
import { Plugin, Cordova, IonicNativePlugin } from '@ionic-native/core';
// import { Observable } from 'rxjs/Observable';

/**
 * @name ArUco
 * @description
 * This plugin does something
 *
 * @usage
 * ```typescript
 * import { ArUco } from '@ionic-native/ar-uco';
 *
 *
 * constructor(private arUco: ArUco) { }
 *
 * ...
 *
 *
 * this.arUco.functionName('Hello', 123)
 *   .then((res: any) => console.log(res))
 *   .catch((error: any) => console.error(error));
 *
 * ```
 */
@Plugin({
    pluginName: 'ArUco',
    plugin: 'cordova-plugin-aruco', // npm package name, example: cordova-plugin-camera
    pluginRef: 'cordova.plugins.ArUco', // the variable reference to call the plugin, example: navigator.geolocation
    repo: '', // the github repository URL for the plugin
    install: '', // OPTIONAL install command, in case the plugin requires variables
    installVariables: [], // OPTIONAL the plugin requires variables
    platforms: ['Android', 'iOS'] // Array of platforms supported, example: ['Android', 'iOS']
})
@Injectable()
export class ArUco extends IonicNativePlugin {

    /**
     * This function does something
     * @param arg1 {string} Some param to configure something
     * @param arg2 {number} Another param to configure something
     * @return {Promise<any>} Returns a promise that resolves when something happens
     */
    @Cordova()
    openCVVersionString(): Promise<any> {
        return; // We add return; here to avoid any IDE / Compiler errors
    }

    @Cordova()
    startCamera(): void { }

}
Cordovaプラグインの時はコールバックで返り値を返していましたが、Ionic NativeプラグインではPromiseで返します。ここではopenCVVersionStringがこの記述だけでPromiseで値を返すようになります。startCameraは何も返さないので、返り値をvoidにしています。
ここまででOpenCV ArUcoをプラグインとして使う準備は終わりました。次は、このプラグインを試すアプリを作ります。
デモアプリを作る
まず、作業用ディレクトリにionicのアプリの雛形を生成し、先ほどのプラグインを読み込みます。
$ cd <work-directory>
$ ionic start ArUcoDemoApp blank
$ cd ArUcoDemoApp
$ onic cordova plugin add ../ArUcoCordovaPlugin/
$ npm install --save ../ionic-native/dist/@ionic-native/ar-uco
これでプラグインのインストールは終わりです。あとはファイルを編集していきます。
デモアプリのコードの作成
デモアプリのコードははsrc/pages/homeの下のhome.htmlとhome.tsに記述します。それぞれ以下のようになります。
home.html
<ion-header>
  <ion-navbar>
    <ion-title>
      ArUco Demo App
    </ion-title>
  </ion-navbar>
</ion-header>

<ion-content padding>
  <ion-item>
    <button ion-button full (click)="showOpenCVVersion();">OpenCV Version</button>
  </ion-item>
  <ion-item>
    {{version}}
  </ion-item>
</ion-content>
home.ts
import { Component } from '@angular/core';
import { NavController } from 'ionic-angular';
import { ArUco } from '@ionic-native/ar-uco';

@Component({
    selector: 'page-home',
    templateUrl: 'home.html',
    providers: [ ArUco ]
})
export class HomePage {

    public version: string;

    constructor(public navCtrl: NavController, private aruco:ArUco) {

    }

    showOpenCVVersion() {
        this.aruco.openCVVersionString().then(v => {
            console.log('callback from openCVVersionString ' + v);
            this.version = v;
        });
    }

    start () {
        this.aruco.startCamera();
    }
}
アプリのビルド
ios用のプラットフォームを追加してアプリのビルドを行います。アプリのトップディレクトリで以下のコマンドを実行します。
$ cd <app top directory>
$ ionic cordova platform add ios
$ ionic cordova preppare
ここで一つ注意が必要です。このままXcodeでビルドすると、OpenCVのビルドでエラーとなります。OpenCVの中で使っている”NO”というマクロとiOSの標準のマクロの”NO”がぶつかるためです。いくつか回避方法は出ていますが、Ionicで使える方法の一つで、platforms/ios/ArUcoDemoAppの中にあるArUcoDemoApp-Prefix.pchに以下を書き加えます。
#ifdef __cplusplus
    #import <opencv2/opencv.hpp>
#endif
書き加えたファイルは次の通りです。
/*
 Licensed to the Apache Software Foundation (ASF) under one
 or more contributor license agreements.  See the NOTICE file
 distributed with this work for additional information
 regarding copyright ownership.  The ASF licenses this file
 to you under the Apache License, Version 2.0 (the
 "License"); you may not use this file except in compliance
 with the License.  You may obtain a copy of the License at

 http://www.apache.org/licenses/LICENSE-2.0

 Unless required by applicable law or agreed to in writing,
 software distributed under the License is distributed on an
 "AS IS" BASIS, WITHOUT WARRANTIES OR CONDITIONS OF ANY
 KIND, either express or implied.  See the License for the
 specific language governing permissions and limitations
 under the License.
 */
//
// Prefix header for all source files of the 'ArUcoDemoApp' target in the 'ArUcoDemoApp' project
//

#ifdef __cplusplus
    #import <opencv2/opencv.hpp>
#endif

#ifdef __OBJC__
    #import <Foundation/Foundation.h>
    #import <UIKit/UIKit.h>
#endif
このファイルは、iosプラットフォームを削除すると無くなりますので、iosプラットフォームを追加するたびに変更が必要です。
最後にXcodeを立ち上げてビルドし、デバイスに転送します。
$ open platforms/ios/ArUcoDemoApp.xcworkspace
アプリの実行
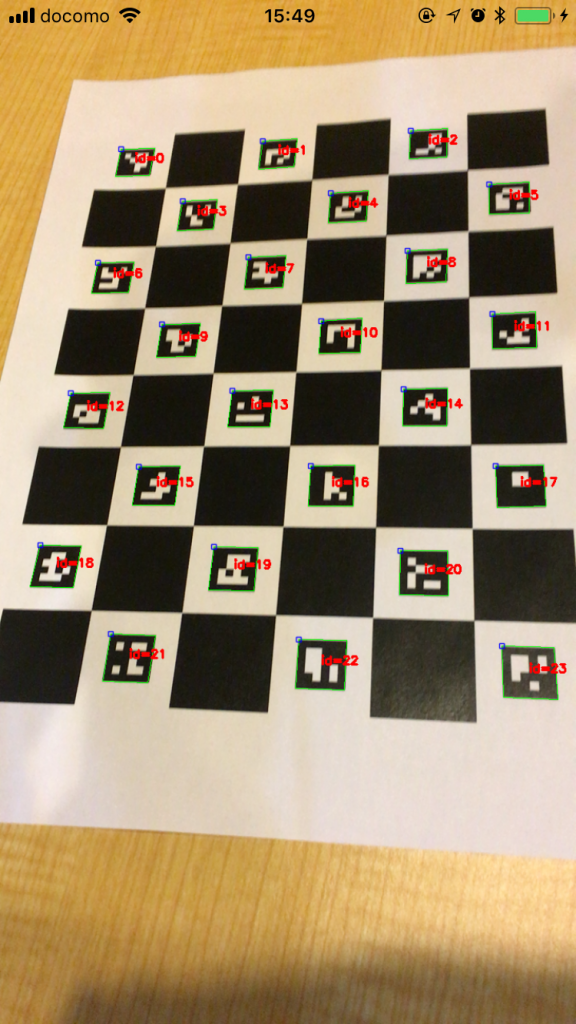
アプリを起動し、ArUcoのチェスボードを写してみたところです。
終わりに
OpenCVは今時のモバイル機器で十分に動作するので、カメラやマイクの付いているモバイル機器では色々と活用できると思います。今回、iOSしか作りませんでしたが、最初に想像したより簡単にプラグイン化することができました。Androidのプラグインも難しくないと思います。
Ionic/CordovaやReact NativeなどでOpenCVが使用できると手軽にモバイルアプリに組み込むことができるようになります。